

We spent most of this week learning about volcanoes! We have explored volcanoes in the past when we did a unit on dinosaurs, but M is older now and was interested in learning about the parts of a volcano and understanding what causes a volcano to erupt.
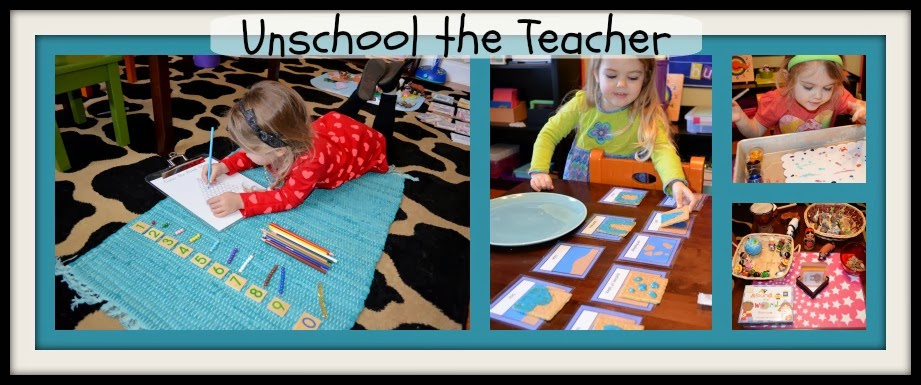
We received the Magic School Bus Volcano Kit (Amazon affiliate link) through the Young Scientists Club (we receive a monthly kit). It started with a lesson on the layers of the Earth, so I prepared a set of 3 part cards from The Helpful Garden and printed blackline masters to make a booklet.
As she was reading the names (we use the 3 part cards for reading practice now as well), we talked about the meaning of the words - inner core, outer core, mantle and crust. I asked her what she thought of when she read the word "crust" and she said it was like the crust on pizza or bread. I quickly grabbed a piece of bread and remembered reading that you can paint on bread with colored milk. We colored the milk with a couple drops of food coloring to make red and yellow to match the diagram in her Magic School Bus guide and she painted the bread to look like a slice of Earth. She tried using a paint brush at first, but found it was easier to fill an eyedropper with the milk and "paint" by dripping the color on the bread. She made a red "core" in the middle, then painted the yellow mantle right inside of the crust. Finally, she mixed together the remaining red and yellow milk to make orange and painted the "outer core."

Next, I showed her the Parts of a Volcano nomenclature cards (also from Helpful Garden). I made a blackline master by copying one of the volcano images into word. M loved learning all of the new nomenclature, and was able to read most of the words on her own. She colored and labeled her own booklet as she went.


You can see in the second picture above that I colored each of the highlighted parts of the volcano in red. (I did the same with the layer of the Earth cards. Some of the sets from The Helpful Garden use multiple colors. She has updated some versions of her cards to use only red, but the older cards have not been updated.)
Now that she knew how a volcano worked, it was time to build a volcano model! We bought a six pack of soda specifically for this project (we don't keep soda in the house), which M thought was pretty funny. I read that the shape of the soda bottle was better for the reaction. The Magic School Bus kit included two sheets of black construction paper that you wrapped around the soda bottle to make a cone shape. We then paper mache'd over the construction paper using a 1:1 flour / warm water mix. We have done paper mache before (see our African milk jug mask), and I thought that M would bail on me, but she actually did about 90% of the volcano on her own.


This lead to some Practical Life - washing the table!
We took a break for lunch and played for a while. Then, after the baby went down for her afternoon nap, M asked if we could read the Magic Treehouse book we picked up from the library. Vacation Under the Volcano (Book #13) (Amazon affiliate link) is one of the shorter books, so we actually read the entire book from start to finish! In the story, Jack and Annie travel back in time to the Roman Empire to save a book from being destroyed when Mt. Vesuvius erupts near Pompeii.
After the story, we took out the pumice samples that came in the Magic School Bus kit. M compared them to some of her rocks from her rock collection, and was surprised by how light they were. She looked at the pumice with her magnifying glass and saw that it had lots of little holes. She decided to draw a picture of it before moving on to the next experiment.


After sketching, she put the pumice and other rocks in water to see if they would sink or float. The pumice floated, while the rocks sank to the bottom. (This was a nice addition to our lesson on density last week!)


The water activity turned into a giant volcano-design-water-pouring-mess-everywhere activity. I pretty much closed my eyes and let her go (eventually moving her off the table and into the kitchen sink). She promised to clean everything up when she was done "experimenting" (and she did). She had elaborate explanations for how she arranged the scoops and cups (magma travelling up from the magma chamber, ash clouds, etc.) and used her "parts of a volcano" booklet to describe it all to me.

We wrapped up the long day by reading the National Geographic Reader "Volcanoes!" (Amazon affiliate link).
The next morning was co-op and the theme was, you guessed it, volcanoes! I redid the layers of the Earth lesson, then we looked at picture cards of all different volcanoes, and M showed her friends her parts of a volcano booklet. We passed around M's pumice samples, and compared it to a piece of lava rock from Hawaii.

The kids used hardening clay to make volcano models. (This project was a fail. We used mini plastic water bottles and wrapped the clay around the bottles and put it outside to harden. The clay cracked and most of it fell off of the bottle.)
After snack, we gave the kids small cups of baking soda and vinegar with red food coloring, and let them make "lava" on their trays. This was a good exercise in fine motor skills. I got tiny spoons from the dollar store that they used to scoop baking soda from the cup into the wells on the plastic trays. Then they used the eyedropper to drop vinegar onto the tray to see the "volcano" erupt. When their tray was full, they could use the eyedropper to transfer the liquid back into the cup and start over.

On Wednesday morning, M painted her volcano and put it outside to dry.


Later that evening, she FINALLY got to test out her volcano! We followed the directions in the Magic School Bus kit and combine baking soda, water and dish soap in the bottle, then added the red-colored vinegar to make it erupt. It was pretty cool to watch (the dish soap helps it to bubble more), and M repeated it several times before we cleaned up for bed.


We got a second viewing on Thursday at co-op (after repairing everyone's broken volcanoes with a layer of paper mache).

This was definitely a fun unit! I have a feeling there will be more volcanic eruptions in the near future. Good thing I bought our baking soda and vinegar at Costco. ;)
Disclaimer: This post contains Amazon Affiliate links. I receive a small commission for all purchases made through affiliate links. There is no additional cost to you for making a purchase through an affiliate link.
Wow! This looks like SO much fun! Thanks for all the ideas and tips for learning about volcanos. I can't wait to try this with my Little Bee when he is a little older. :)
ReplyDeleteThanks Vanessa! We had so much fun with it! :)
DeleteThanks Vanessa! We had so much fun with it! :)
Delete